Showing posts with label Flowers Homemade. Show all posts

Saturday, April 2, 2011

Felt Flower Pillow

MONDAY, SEPTEMBER 6, 2010

Felt Flower Pillow to DIE FOR! {with Tutorial!} :)

Have you ever fallen head over heels in LOVE with a pillow? Be honest!  Well, it happens to me all the time. I had a full-on, head over heels, obsessive, CRUSH on this little guy! Savannah and I might have had a full on brawl fighting over this guy! UNTIL....

We looked at the price tag. $49.95. WHAT???? ARE YOU STRAIGHT SERIOUS?? ITS A PILLOW!???!!!!! Shame on you Z-Gallerie!!!! Let's just say, it was like the biggest turn off ever! We left the store, pillowless. Still, I couldn't get him off my mind. 

I made up my mind. I was going to ATTEMPT to make Sav a pillow to match her bedroom (in Grey) and me my very own in black! That way there was no cat fight! I surprised Savannah with my own version on Saturday and she called me 2-3 times after I left her house to thank me! What are besties for right!???

Here's how I did it....

First I recovered a very eh... just okay looking pillow that once sat on my couch. 

If you don't know how to do a basic pillow re-cover its about the simplest thing ever and there a zillion tutorials out there. Google it! If you can sew a straight line, you can make this pillow. PROMISE! 


Next I cut out about 1,000,000 petals. Not really, more like 100 but it was A LOT! I did about 30 large, 30 medium, 30 small probably. I honestly did count them....
But like I said... A LOT!
Then all I did was arrange them how I wanted them on the pillow to make sure I made enough. I was so glad I did and I had 4 left over - haha!


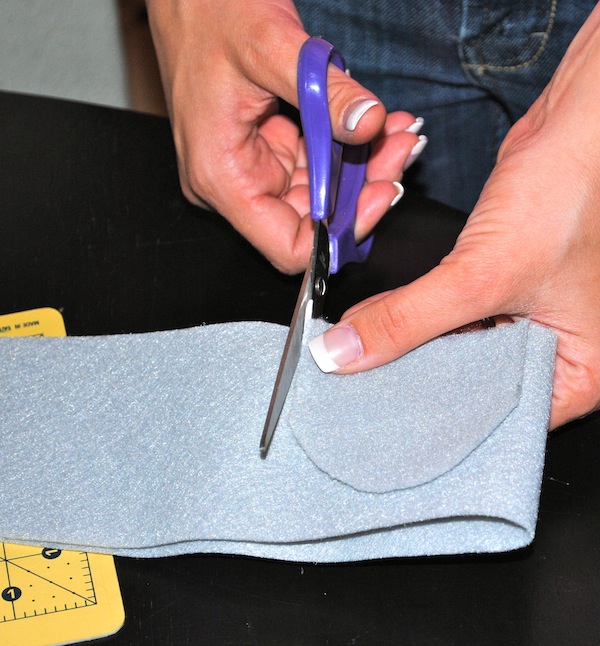
Then I did my center a little different than Z-Gallerie's... I kinda like the way I did it better. Just sayin... haha

I cut out 3 circles using a cup and a sharpie as a pattern.


Folded it in half....
and in half again...

Finally, I HOT GLUED everything on! I could've sewn it but the hot glue worked magically and it was super quick and easy and lets face it, I was getting anxious to get it done.  For the center, I glued 3 of these (above) "petals" in the middle in a cluster to make the inside of the flower. 

I. AM. OBSESSED. I will be making a zillion of these for Christmas gifts this year. (and your birthday Kylie, as promised! LOVE U!)


It looks even BETTER in person and even BETTER perched on Savannah's adorable bed!
I'm trying to get her to fix a lamp in her bedroom so we can show you her Master Bedroom. You will just die! 

Would you be interested in me making one for a GIVEAWAY?? Let me know! If I get enough feedback from you ladies I will just have to make one to give away!

Linking up to these FAB parties:


Monday:
Soclialize WIth Me Monday til Sunday
Mad Skills Party
The Girl Creative


Tuesday:

Photobucket


Get Your Craft On Tuesday
Saturday:


Join  us Saturdays at tatertotsandjello.com for the weekend wrap  up           party!


Funky Junk's Saturday Nite Special

Photobucket

Paper Punch Flowers

http://go.tipjunkie.com/ea/345/www2.fiskars.com/Activities/Crafting/Project-Gallery/Other-Projects/DIY-Dimensional-Paper-Flowers


http://go.tipjunkie.com/ea/345/www2.fiskars.com/Activities/Crafting/Project-Gallery/Other-Projects/DIY-Dimensional-Paper-Flowers


DIY Dimensional Paper Flowers

DIY Dimensional Paper Flowers

Designer: Lisa Storms

Difficulty rating: Intermediate
Flowers are definitely a crafting staple. They seem to be that one embellishment that you can pop onto just about anything to add a little interest, drama, or pop of color. So I never tire of coming up with new ways to create them!
flowers_singleflower
I would be willing to bet that you would not be able to guess which punch I used to create the above flower. Any guesses? It's the scalloped square (Square-A-Licious) squeeze punch. I came up with this technique on accident, and I have to say it is quite addicting. This folding technique creates wonderful dimension without using any foam adhesive, etc. Here's how you do it:
1. Punch a scalloped square and mark the center (just eyeball it) with a pencil. Cut from the center of each side toward the center, stopping shy of the center mark.
2. Fold in each cut as shown, folding from the center up to the first scallop. Repeat for all cuts.
flowers_bluedemo1
3. Once folded, turn over. The folded pieces add the dimension. Snip off the middle scallop from each petal with scissors.
flowers_bluedemo2
4. Repeat steps to create second flower. Fan and adhere at centers. Top with brad or button. Here I have also included a spiraled center by spiral-cutting a Seal of Approval squeeze punch and rolling up to adhere.
flowers_zoom
Play around with layering different sizes and colors. Once you get this technique down, you can try a fun variation using decorative corner punches. Simply cut out a 2 inch square of cardstock and deco-punch all corners. Fold the same way as above, but first snip off the corners from each cut. This avoids these corners showing through your decorative punched design. Repeat with a second flower and layer for dimension.
flowers_pinkdemo
I knew a wreath would be a fun way to display my flowers, but I couldn't find a wreath base around the house. Instead I cut out a base of chipboard by tracing and cutting circles onto chipboard using the Super Sized Circles template and wrapped with thin twine. The flowers were hot-glued to secure.

Friday, April 1, 2011

Paper Punch Flowers


DIY Dimensional Paper Flowers

DIY Dimensional Paper Flowers

Designer: Lisa Storms

Difficulty rating: Intermediate
Flowers are definitely a crafting staple. They seem to be that one embellishment that you can pop onto just about anything to add a little interest, drama, or pop of color. So I never tire of coming up with new ways to create them!
flowers_singleflower
I would be willing to bet that you would not be able to guess which punch I used to create the above flower. Any guesses? It's the scalloped square (Square-A-Licious) squeeze punch. I came up with this technique on accident, and I have to say it is quite addicting. This folding technique creates wonderful dimension without using any foam adhesive, etc. Here's how you do it:
1. Punch a scalloped square and mark the center (just eyeball it) with a pencil. Cut from the center of each side toward the center, stopping shy of the center mark.
2. Fold in each cut as shown, folding from the center up to the first scallop. Repeat for all cuts.
flowers_bluedemo1
3. Once folded, turn over. The folded pieces add the dimension. Snip off the middle scallop from each petal with scissors.
flowers_bluedemo2
4. Repeat steps to create second flower. Fan and adhere at centers. Top with brad or button. Here I have also included a spiraled center by spiral-cutting a Seal of Approval squeeze punch and rolling up to adhere.
flowers_zoom
Play around with layering different sizes and colors. Once you get this technique down, you can try a fun variation using decorative corner punches. Simply cut out a 2 inch square of cardstock and deco-punch all corners. Fold the same way as above, but first snip off the corners from each cut. This avoids these corners showing through your decorative punched design. Repeat with a second flower and layer for dimension.
flowers_pinkdemo
I knew a wreath would be a fun way to display my flowers, but I couldn't find a wreath base around the house. Instead I cut out a base of chipboard by tracing and cutting circles onto chipboard using the Super Sized Circles template and wrapped with thin twine. The flowers were hot-glued to secure.