Showing posts with label Jewelry. Show all posts

Tuesday, March 29, 2011

Clay Necklace

Crafting with kids: Valentine’s Day

Hello to the Multiples and More community, I'm Tonya from Create-Celebrate-Explore and I will be taking over from Missy's Craft Corner. Good luck to Missy and a big thank you to Amanda for asking me to be a contributor.
For those who don't know me, I was born and raised in Melbourne, Australia, but have been living in California since 2003. My husband is a Marine and we are parents to 4 year old twins Marisol and Flynn and a 15 year old, Jayden.
With Valentine's Day just a couple of weeks away I thought this holiday would be a great place to begin for my first post.
My twins are having a Friendship Tea Party in their preschool class for Valentine's Day, so we decided to make beaded bracelets for the girls in the class. Of course these bracelets could be made for any occasion - play date, rainy day activity, stocking stuffer, the list goes on.
061b
What you will need:
  • Polymer Clay - we used red, white, green, brown and pink
  • Plastic Lacing - such as this one, can be found in craft stores for beading
  • Small cookie cutter - I used a small square fondant cutter
  • Rolling pin - the kids used the one from their play-doh kit
  • wax paper
  • olive oil
  • thick sewing needle
    To make:
Turn the oven onto 275(F).
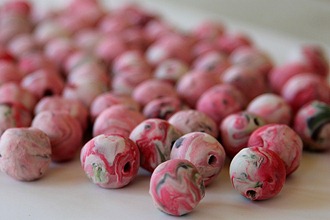
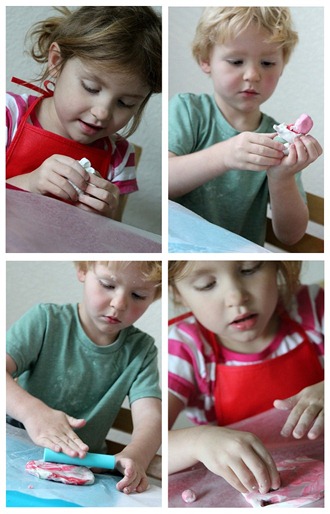
Give each of the kids a piece of wax paper to mold and roll their polymer clay on – the wax paper prevents sticking. Have them experiment with mixing colors together, then roll their clay and cut out small pieces which they can roll into balls (beads). The reason we use a cookie cutter is so the balls are roughly the same size.
kids working with clay
This next step can be completed by older children (or a grown-up). Dip the end of your needle into a little olive oil (this prevents the clay from sticking to the needle as you are making a hole in the bead). Very carefully push the sharp end of the needle through the bead making sure that the hole is wide enough to thread the plastic lacing through.
033
Bake the beads on a tray for approximately 30 minutes – it is recommended that clay is baked for 15 minutes per 1/4 inch thickness. Set aside to cool.
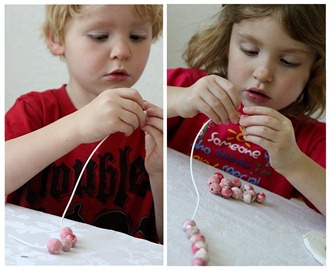
While the beads are cooling cut the plastic lace into 17-18 inch lengths. Tie a knot in one end and then again after each bead has been threaded on – this will prevent the beads from hitting each other.
lacing clay beads
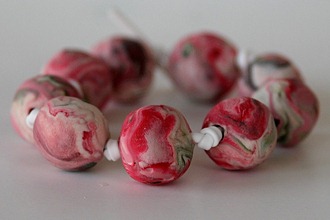
Tie the ends together and snip off any long ends so they are about 5mm long. Done! As you can see from the photo below we had a few extra beads left over so Marisol decided to make a necklace too.
054
I will most likely do an Easter craft in March so if there is anything in particular you would like me to cover please leave your suggestions in the comments below.
Happy Crafting!
Tonya
Sunday, March 27, 2011

Fabric Necklaces

http://tatertotsandjello.blogspot.com/2010/03/spring-project-ruffle-necklaces.html


I'm thinking about trying these at Eve's next sleepover.


 3.16.2010


I am ready for Spring and warm weather! As I was checking out blogs a few weeks ago, I spotted a cute idea at Creature Comforts. It got my mind thinking about Spring and making some cute necklaces that would jazz up a plain Spring t-shirt.

So I got out my fabric scraps and went to work.Of course I had to try making one with burlap. I used an old t-shirt and backed the burlap with the soft material so it wouldn't be itchy.


Nautical - very Springish!


There is a great tutorial on Creature Comforts. I changed a few things; here is what I did:

Supplies:

Jewelry wire (flexible)
needle-nose pliers and jewelry pliers
scraps of material
Embellishments -- buttons, brooches, lace, whatever you dream up!
thin jewelry chain
lobster clasp
jump rings ( 4 per necklace)
ribbon
  • Cut about 10 inches of jewelry wire
  • Make a loop at one end of the wire using your needle-nose and regular pliers. If you need instructions on how to do this -- click HERE. Set the wire aside.
  • Cut a length of fabric approximately 5-6 inches in width and about 16 inches in length. {this depends on how wide you would like you necklace and how ruffly. 16 inches in length will be quite ruffly. You can always cut a little off your length -- so overestimate}
  • There are 2 ways I made the fabric parts of the necklaces. One, I folded the material over so the ends met and sewed a straight line about 1/4 under the fold.
  • The second is a little trickier -- Get your iron out. Iron a small seam -- 1/4 inch on both sides of the length of your fabric. You want the ends to fold in toward the wrong side of the fabric. Then fold the seams toward each other and iron the material down the length of the fabric. Your material should be right side out on both sides.Then sew a straight stitch down the edge of the length of the material to close up the seams you just made. This will keep the raw edges from unraveling.
  • Now make another straight stitch about 1/4 inch under the stitch you just made. This will make an opening in the material that you can thread your wire through. 
  • Now thread your wire through the opening -- using the unfinished side of the wire through the opening.
  • Once you have threaded the wire through, you will be able to see how ruffly the necklace is going to look. You can trim some of the material off if you want a less ruffly look. Scrunch the material down a little and make another loop on the other end of the wire just as you did at the beginning. 
  • Add jump rings to each side of the loops. 
  • Attach about 6 inches of fine chain to each of the jump rings on each side of the necklace. 
  • Attach a jump ring to each of the other side of the chain at the top of the necklace and attach your lobster clasp.
  • Now you can add your embellishments. On some of the necklaces I hot glued ribbon to cover up the seam at the top. Then I made flowers out of some alternating material and added scrapbooking embellishments or brooches.
http://go.tipjunkie.com/pa/781/hankandhunt.blogspot.com/2011/03/60-is-sweet.html

http://www.thesweetestoccasion.com/2011/02/diy-ruffle-garland/

Fabric Necklace

http://www.cutoutandkeep.net/projects/fabric-necklace


Instructions 
  1. 1
    Step 1
    I had a t-shirt that I was about to trash. It has the perfect fabric for the necklace!
    I cut 5 layers from the t-shirt.
  2. 2
    Step 2
    I streched them so they got thin.
    I left one long piece (For the neck)
    I cut the rest 4 different lenghts.
  3. 3
    Step 3
    When you strech the fabrin it tends to turn in one side.
    I took those 4 pieces as one piece, put them together. I attached the back side of them to the back side of the neck piece and sewed them.
  4. 4
    Step 4
    After I finished, I hid the stitches inside.
  5. 5
    Step 5
    I cut a long piece from the t-shirt. I folded and sewed both sides. I used needle because I didn't have sewing machine. Machine would do better of course!
    I turned inside out.
  6. 6
    Step 6
    I cut another little piece for the middle of bow. I tied it on the back but you can sew it, I was too lazy! :)
  7. 7
    Step 7
    I attached the bow to the necklace.
    Enjoy!
Versions (1) 

Have you made this project? Share your version »