Showing posts with label Paper Crafts. Show all posts

Friday, April 1, 2011

Paper Punch Flowers


DIY Dimensional Paper Flowers

DIY Dimensional Paper Flowers

Designer: Lisa Storms

Difficulty rating: Intermediate
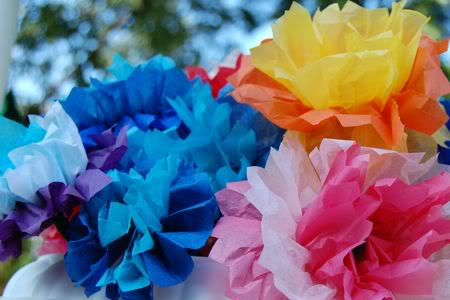
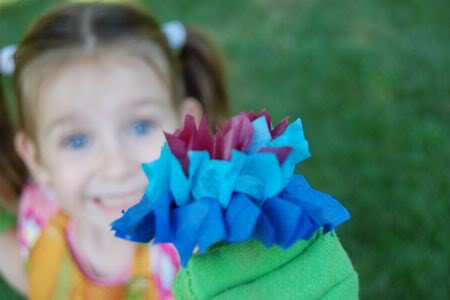
Flowers are definitely a crafting staple. They seem to be that one embellishment that you can pop onto just about anything to add a little interest, drama, or pop of color. So I never tire of coming up with new ways to create them!
flowers_singleflower
I would be willing to bet that you would not be able to guess which punch I used to create the above flower. Any guesses? It's the scalloped square (Square-A-Licious) squeeze punch. I came up with this technique on accident, and I have to say it is quite addicting. This folding technique creates wonderful dimension without using any foam adhesive, etc. Here's how you do it:
1. Punch a scalloped square and mark the center (just eyeball it) with a pencil. Cut from the center of each side toward the center, stopping shy of the center mark.
2. Fold in each cut as shown, folding from the center up to the first scallop. Repeat for all cuts.
flowers_bluedemo1
3. Once folded, turn over. The folded pieces add the dimension. Snip off the middle scallop from each petal with scissors.
flowers_bluedemo2
4. Repeat steps to create second flower. Fan and adhere at centers. Top with brad or button. Here I have also included a spiraled center by spiral-cutting a Seal of Approval squeeze punch and rolling up to adhere.
flowers_zoom
Play around with layering different sizes and colors. Once you get this technique down, you can try a fun variation using decorative corner punches. Simply cut out a 2 inch square of cardstock and deco-punch all corners. Fold the same way as above, but first snip off the corners from each cut. This avoids these corners showing through your decorative punched design. Repeat with a second flower and layer for dimension.
flowers_pinkdemo
I knew a wreath would be a fun way to display my flowers, but I couldn't find a wreath base around the house. Instead I cut out a base of chipboard by tracing and cutting circles onto chipboard using the Super Sized Circles template and wrapped with thin twine. The flowers were hot-glued to secure.

Tuesday, March 29, 2011

Blooming Spring Branch

The girls have been busy crafting up lots of Spring decorations for our home! This Spring branch craft is so bright and cheerful — I cannot wait to put it up on display in our foyer to welcome guests!!
I drew some branches on a sheet of paper with a brown marker, then showed Clara how to scrunch up pieces of tissue paper into balls to form the flowers. This is a great project for recycling pieces of used gift tissue!
She had lots of fun dipping these “flowers” into some glue, and sticking them to the paper!! Extra bonus points for wearing stylish sunglasses while crafting!
I love how the blossoms that aren’t on the branches look like they are blowing away in the wind. Festive, fun, and frugal!
Have fun!!

Feild Guides For Kids

When I took Emily to the book store the other night, we looked for some field guides to add to her backpack for nature hikes, but they were very expensive. I found a great way to make a more child-friendly version. It is simple and easy to make yourself. To make your own bird field guide, you will need cardstock, a binder ring, and some clear contact paper.
Go to whatbird.com and create your own customizable bird field guide. I tried to pick species that we see regularly in our own backyard, and are easy to recognize (robins, blue jays, cardinals, etc). Print out the sheets and laminate with clear contact paper. Punch a hole in the top corner and attach a binder ring. Presto! Fabulous and frugal field guide!
I plan to make more of these for butterflies, wildflowers, plants, etc. — each on its own binder ring. This one is 3″ x 3″, the perfect size for little hands. She can easily flip to a page, identify a bird, and use a dry-erase marker to record the sighting. The contact paper will protect it from the elements, and helps it to withstand lots of use. More on Emily’s backpack for nature hikes later…

Preschool spring projects

SPRING PRESCHOOL PROJECTS

Here are a few more preschool projects I wanted to share with you. 
Butterflies. Wheat Grass. Lima Beans.
 027 
The butterflies are simply tissue paper pinched in the center and held with a wooden clothes peg.
The wheat grass has finally ventured from the preschool room to our window sill in the kids play room where they can continue to watch it grow and care for it until we replant it.
I'm not so sure about the lima bean project, however we will give it a try.  The lima bean is inside the zip-lock bag which is open at the top and has moist paper towels inside it.  I've taped the bag to the inside of the window that gets the afternoon sun.  We shall see if it begins to sprout.  Fingers crossed.
These are such simple ideas for homeschooling, garden parties and for those rainy days when you are looking for a project to entertain your little ones.

Flower Straws

http://multiplesandmore.blogspot.com/2011/02/crafting-with-kids-spring-flowers.html


Crafting with kids: Spring Flowers

Spring is just around the corner.
Here is a beautiful bouquet of straws flowers you can make with your kids.
Flower Straws
Items needed:
  • Bendy straws
  • Flower cookie cutter or stencil
  • Assorted scrapbook paper – preferably card stock (this is a great way to use up scraps)
  • Glue Stick
  • Scissors
    To make:
Trace around the stencil or cookie cutter with a pencil
Flower Stencil
Cut out the flower shape and cut out some smaller circles too - trace around a tiny glass on plain card stock (we used circles from Martha Stewarts Playground Multimedia Pad).
cut out collage
Next, glue the center spot onto the flower, then a grown-up will need to punch a hole through the center of the flower. Then have your child very gently push the straw from the bottom up through the flower until it is at the top of the bendy part. Bend the straw and the flower will stay there.
flower collage
Now get them a special drink to try out their fabulous fancy spring straws.
Flower Drinking Straws
Happy Crafting!
Tonya

Sunday, March 27, 2011

Streamers

These colorful streamers are so much fun to make, and are a great way to brighten up any outdoor space — they are completely waterproof! The girls had a blast, and we were left with very little clean up afterwards!
To make your own, lay down strips of inexpensive packaging tape with the sticky side up, and invite your child over to sprinkle bits of tissue paper on top.
This is a fun way to practice fine-motor skills, plus it is so bright and colorful!
Next, place another piece of packaging tape on top with the sticky side down. Press firmly along the strip. I cut each streamer into half width-wise, and then we decorated our backyard with these fun streamers!!
I love how they shine when the light goes through them!
The girls were so proud of their artwork!!

Mobile

This intergalactic garland could not be any simpler, and the kids love making them to hang all around the house! This one is hanging up in our dining room now. To make your own star garland you will need string and star-shaped Post-It notes. That’s it! Simple, right?
Lay out the string and invite your child to sandwich the string between two sheets of star-shaped Post-It notes (stinky sides facing each other). Press together firmly, and repeat down the length of the string. Hang it up to display and enj

Tissue Paper Flowers

http://www.frugalfamilyfunblog.com/2009/09/how-to-make-tissue-paper-flowers.html


September 25, 2009
We make tissue paper flowers on a regular basis in our household, and I’ve blogged about them before here and here. We have even been known to make spontaneous deliveries of these to our local assisted living center! During the Fall and Winter months, they can be a nice reminder of warmer weather, and they always look so bright and cheerful! I thought I would share our tissue paper flower technique with you. It’s very easy!
First, cut 3 sheets of tissue paper about 5 x 7 ” or so (you can just eyeball it). Begin folding the shorter end accordion style with folds about every 1/2 inch.
Gather the center of the flower by wrapping a pipe cleaner around it as shown.
Now, snip the ends of the tissue paper to make points. This will give the petals a nice shape.
Carefully separate the layers of tissue paper….
And enjoy your beautiful flower! We’ve sprayed ours with a little perfume to make them smell nice too.
So bright and cheerful, and very frugal!